
11/22/2019
I've come to rebuild you again.
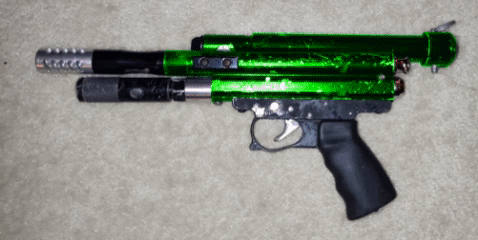
 So I robbed Peter to pay Paul and I have an amazing Spump build to show for it. I kept the body of the Spydarm since it was a reminder of my tinkering past. Now it's time to apply my new skills to an old marker.
Going through my old gear bins, I have scavenged these parts for the build:

- Original Spydarm body
- Modern pullpin RVA
- Need to modify or source an older generation
- Stock main spring
- Stock bolt
- Slim striker
I also just purchased an old skool single trigger frame from another user on MCB.
 Things to replace/fabricate:
- Striker buffer
- Main spring guide
- Metal spring guide plate
- Pull pin
- Valve pin
- Cupseal
- Valve spring
- Valve
- Ball detent
- Detent plate
- Bore out and retap for horizontal 12 gram bucket changer
- Cap the bottom in a less janky way
- Modify the feed tube with a true follower and spring guide
 |
| New parts came in! |
11/29/2019
Got the grip for the frame!
 Shout-out to Mike@NDS on MCB for picking up on the grip for the previously shipped frame! He gave me a few options from an A2 to the original Euro and also a Ramline. From what I could tell, the Ramline and A2 were too m16-y (my Closed Bolt Spyder had an m16 grip waaaaay back in the day so I wasn't keen on it indexing like a rifle rather than a pistol.) I chose to go with the grip this frame came with, originally, the Euro style. It seemed to be the most pistol-like.
 In the hands, it feels quite good! It indexes well even in these early stages. While looking at the bottom of the grip, it seems that I will need make a plate for the retaining screw. While not needed, as a regular bolt and washer will do just fine, designing up a recessed cap and washer retainer would really help tie the project together.
12/9/2019
Small change to the Spydarm today!
 |
| Some new parts came in! |
The other part that came in is a pretty standard Autococker-style pushpin to hold in all the internals. It holds guts in.
Looking over this build, I have a deadline to complete this revive: One week before the Big Money, Cheap Guns Paintball Tournament, February, 23, 2020!
 |
| This is on the board to be the next tournament |
1/13/2020
I've got another Spyder to pick up at the aforementioned game in St Louis... It was offered up as a parts gun from someone on MCB. All they said was to pay for shipping. They were in St Louis so it felt like a no brainier to ask if the were going to be available to drop it at BM/CG? They agreed!
Now I've got the means to rebuild the rest of this custom marker with the exception of one thing... I need a clean way to mount the 12 gram bucket changer. Thinking of shaving the ASA threading on the lathe and tapping a hole to accept the retaining screw so the whole thing can lock in directly into the lower tube. More on that later, back to the parts donor...
 |
| The package secured and on the way home from STL |
4/22/2020
 |
| Chiseled out the old JB Weld &red Loctite |
Full disclosure: I'm VERY surprised that I never blew my hand off with how this was originally designed. I rammed the bucket changer into the LPC receiver and had it snag the first part of the threading. To keep it in there, I slathered it full of JB Weld. While it never had any violent decompression on me, it was seriously not a good idea. Don't do this on your designs, no matter how much it works.
 |
| Finally got it free! |
After doing a bit of research, it seems that old JB Weld can get pretty brittle. (Again, good thing I never chose to air it up again over the last 12+ years!) Other research says that you can just chisel out the bits and chunks without much effort OR you can clean it all out, chemically, with acetone. Give it a couple of days and it will be soft enough to just soften the epoxy in it so it can be brushed off. Having a major jug of it in the workshop, I thought it would be a good idea to just let it work the magic after I get off all I could. I got it all off without the need to get any nasty liquids involved!
 |
| STREAMLINED! |
The only thing that's left is to make sure it's properly greased/oiled then cycle it 30 times with a 12 gram loaded to make sure it works. From there, It's all tweaks and paint!
(But that's likely going to be this weekend...)
4/23/2020
Who doesn't like a video? It's only a cycling video but it's exciting to me! This thing hasn't had any air through it since it went into storage 12 years ago. Since then it became INCREDIBLY dangerous so this custom part came at an excellent time!
4/24/2020
 With the build mostly done, a visual refresh needs to be done on this bad boy, just like the rest of them. I took to Photoshopping (Gimping?) a set of color combos and possibilities.
 Looks like after much review, we are going with the homage to old school splash anno!
4/26/2020
A side trip on the Spydarm journey...
 I've got a drop leg holster that I've had since the early 2000s that was a freebie from one of my distributors. They were trying to get me into selling Airsoft alongside of my other products. They sent me an orange tipped 9mm Beretta and this drop leg holster. I really liked the feel of this purpose built holster, but wasn't not into playing Airsoft. Not at all. Even with integrating it into my Paintball Big Game loadout, shooting 6mm pellets was not very satisfying. This was including getting eliminations. So much form over function.
I've been looking for a larger solution to this. Do I make my own, make a smaller one out of Kydex (non-drop leg), get a generic large format version for Nerf, find an expandable one on Amazon? Then it came to me!
 While working on a different project, I thought it would be a good time to grab the 9mm off the wall and see if I can mod it to take the 3 tubed design of the Spydarm.
As I popped a couple of stitches, the barrel and bucket changer started to poke through. As I continued to get the front end through the bottom, the trigger guard started to get in the way. Next was to pop a few more stitches on the top side to give enough slack for the retainer strap to snap in.
VOILA!
A great way to carry my Spydarm safely during big games!
5/24/2020
The Tenka'ichi Budôkai is finally complete...
 |
| WTF are you talking about? Was that even English? |
It certainly took long enough to get this project redone but if you've been following the build log, it has been a fun journey! With the addition of Kit's Kit from MCB I now have a way to keep the 12 gram Bucket changer on the front in a VERY streamlined way! This build went from old school (non-functional) nostalgia to a day in the sun, shooting at 280fps!
 |
| HOLO! |
 |
| Speed gate for hot rock n cock action! |
Indoor shooting video with Z-Balls:


0 Comments